 One of the main reasons we “condition” inside air is to remove excess moisture from the air. This helps to prevent mold and mildew as well as make the space more comfortable. Depending on the humidity in the air, a large amount of water can be removed each day. That water has to go somewhere!
Also known as condensation, the water is normally collected in a metal pan located inside the unit underneath the cooling coils. Typically you cannot see the condensation pan without removing service panels. From this pan, the water then drains through a line (typically a plastic pipe about 1/2” in diameter) into the house’s sanitary waste system. There should be a “P” trap located outside the system where the drain line ties to the sanitary drain designed to keep sewer smells out of the system.
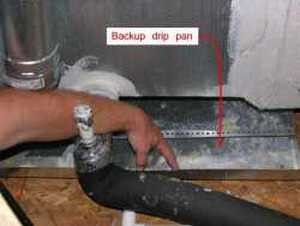
You can check the secondary or safety drip pan (shown in the photo to the left) which is located underneath the unit on the outside of the cabinet. It is a “backup” pan only and does not normally contain any water. In the event the internal pan overflows, leaks, or becomes clogged, this backup pan will carry water to the outside rather than damaging your ceilings or walls. Rather than draining to the sewer, the backup pan typically drains to the outside of the house through a line that is visible from the outside. This is so you will know there is a problem with the internal system. The backup drain may run onto a roof section or into the yard beside the house. But typically the line is where you can see it and it does not normally have water coming out of it. In fact, you may not have ever even noticed it if your system works as it should. The photo to the left shows a system that has leaked into the safety pan for so long that it is rusted through.
You can check things in the attic; look for water in the safety pan. Newer units often have a moisture detector that shuts off the AC unit to prevent flooding of the house or damage to ceilings and 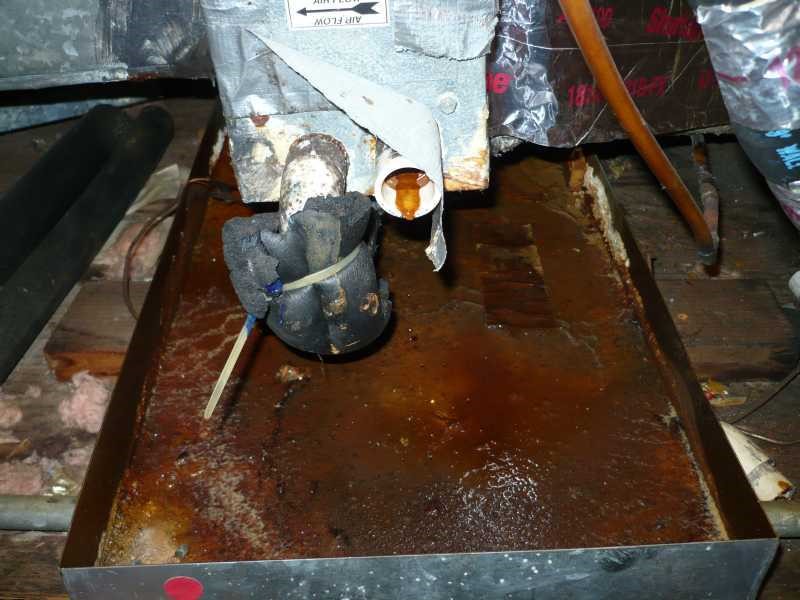 floors. So if your units simply shut down and/or you see water coming from the outside backup drain line on the outside of the house, it is an indication there is a problem with the primary drain. Unless addressed soon, the unit may begin to leak water inside the house, creating conditions for significant water damage, mold and mildew.
It is worth a few minutes of your time to check the pan under your unit. Signs of water or a rusty pan (like the one in the photo) should be investigated by a qualified technician. Ignoring the problem will certainly lead to a more damaging problem at the worst possible time!
Be aware of smaller copper pipes, along with several electrical connections. Be careful not to bend or damage insulation or connections during your checkup.
A properly charged unit will have a wet or sweaty “suction” or return line. The suction line is the large copper pipe which is typically connected to the unit’s service valve near the base of the
outdoor unit. The return line should be checked with your fingers while the unit is running. The pipe might be insulated with a foam covering. Check at the end of the insulation near the valve for a wet and cold line. If it is not cold to the touch or if it is ice-covered, the unit is likely undercharged. A qualified technician is needed to find and fix the leak.
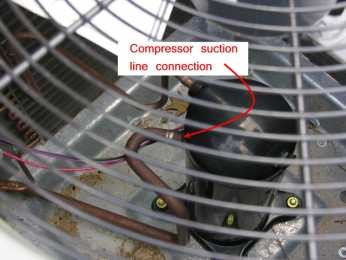 A thorough check is slightly more complicated but is still often doable without any tools. Locate the compressor which typically can be viewed while shielding your eyes and looking through the running fan on the outside unit. Position yourself so you can see the copper lines that tie to the compressor’s side. There are at least two lines, one large, one small. The large line is the one you want to observe. If possible, determine if it is wet up to the point of connection with the side of the compressor. A properly balanced system will have a wet area around the return line about the size of a Ritz cracker after it has been running for a few minutes. If the line is dry or if there is ice on the line or side of the compressor, there is a problem.
Too much refrigerant and the compressor will be damaged in time. While overcharging is much less common, it is a good thing to check following an installation or repair. The problem is caused by improper charging. You can check for overcharging at the outside unit called the condenser. Again the unit must have been running for 4 or 5 minutes without stopping. A loud compressor or one that sounds like it’s “surging or looping” are indicators. A solid clue is a really cold or heavily “sweating” compressor over a significant portion on its side or heavy sweating around the base of the compressor. Look through the top grill to see if the compressor is covered in condensation or ice. This condition needs a technician to adjust the refrigerant levels as soon as possible.